
ISO
Shutter speed and aperture control how much light reaches the sensor. ISO determines how much light actually needs to reach the sensor in order to create a successful exposure. The higher the ISO value you or the camera sets then the less light is required. This means you can use a faster shutter speed or smaller aperture than the ambient light levels would otherwise allow.
ISO values typically start at 100 (or occasionally 200). This is the base ISO. There is theoretically no upper limit to an ISO setting but practically (for reasons we will come to in a moment) ISO usually ends somewhere in the range of 6400-51200. Each doubling of ISO doubles the ‘sensitivity’ of the sensor, halving ISO halves the ‘sensitivity’. (So, 200 is twice as ‘sensitive’ to light as 100, but half as sensitive as 400). You adjust ISO in stops in other words. You can either select a specific ISO value, or let the camera determine ISO automatically (Auto ISO) based on the ambient light levels.
Unfortunately, there is a penalty – image noise – when using a camera’s higher ISO values. (Which is the limiting factor of ISO.) Noise coarsens an image, adding a random gritty quality to the image. Noise can be reduced in-camera or in post-production, though this can be just as detrimental to image quality. Heavily-applied noise reduction can smear fine details and textures, and make an image look artificially smooth. Ideally stick to the lower ISO values if possible, unless you need a fast shutter speed to avoid camera shake or a small aperture to increase depth of field.
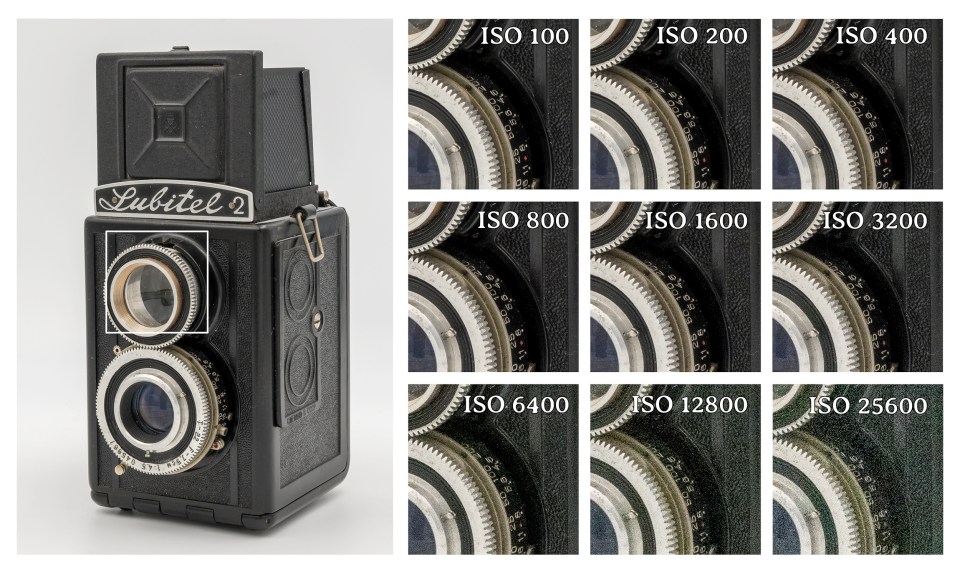
Underexpose an image and then lighten it in post-production and you effectively alter the ISO. Lightening dark images will make noise more visible, particularly in the shadows.