
White Balance
You have a truly amazing brain. Honestly. It works hard to make sense of the world around you, filtering information from your senses so that you can recognise family and friends, and not bump into things too often. It does its job so well that one thing we do not take much notice of is the colour of white light. For white light is often anything but.
Most light sources have a colour bias, typically tending towards red or towards blue. (Due to the relative mix of the various wavelengths of light. Red-biased light has a greater proportion of red wavelengths and so on.) Our brains tend to filter out this colour bias, so that we perceive the light as neutral. It is only when the light is heavily tinted, such as the orange-red of candlelight, that we notice the colour. The relative red/blue bias of light is known as a variation in its colour temperature, measured using the Kelvin Scale (K). The useable range for photographers is from 2000K, which is equivalent to the red-orange light of candlelight, to 7000-8000K, which is the very cool blue light found in heavy shade with blue sky directly overhead. See the diagram below.
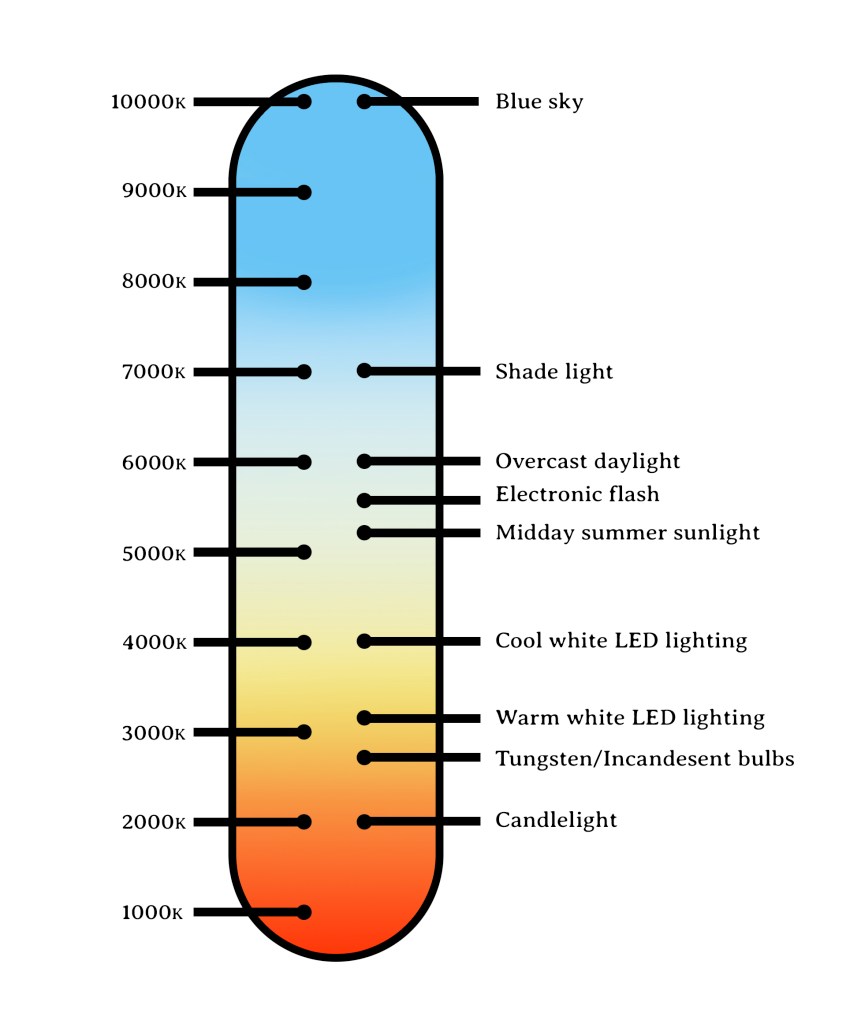
Cameras are not as sophisticated as the human eye/brain combination but they do have a function that helps you correct any red/blue (or occasionally green/magenta) bias in light. This function is White Balance (WB). As the name suggests, WB tries to adjust a photo so that any white surface in the photo is actually white. It does this by adding blue to scenes lit by warm red-orange light, or by adding red to those lit by cooler, bluer light.
There are several ways to change WB. The first is by selecting Auto WB. This lets the camera analyse the light falling on the scene and apply the appropriate correction. Generally this option works well and is a safe option. However, it is not perfect and occasionally gets things wrong – typically when there is a predominant colour in the scene, such as a large amount of red. (The camera mistakes the colour of subject for a bias in the colour of the light and overcorrects.)
The second option is choosing one of a number of presets. These presets correspond to particular types of lighting, such as Tungsten (or Incandescent) which is the preset to choose when you shoot under the light of ordinary household bulbs. See the table below for the range of presets typically found on cameras.
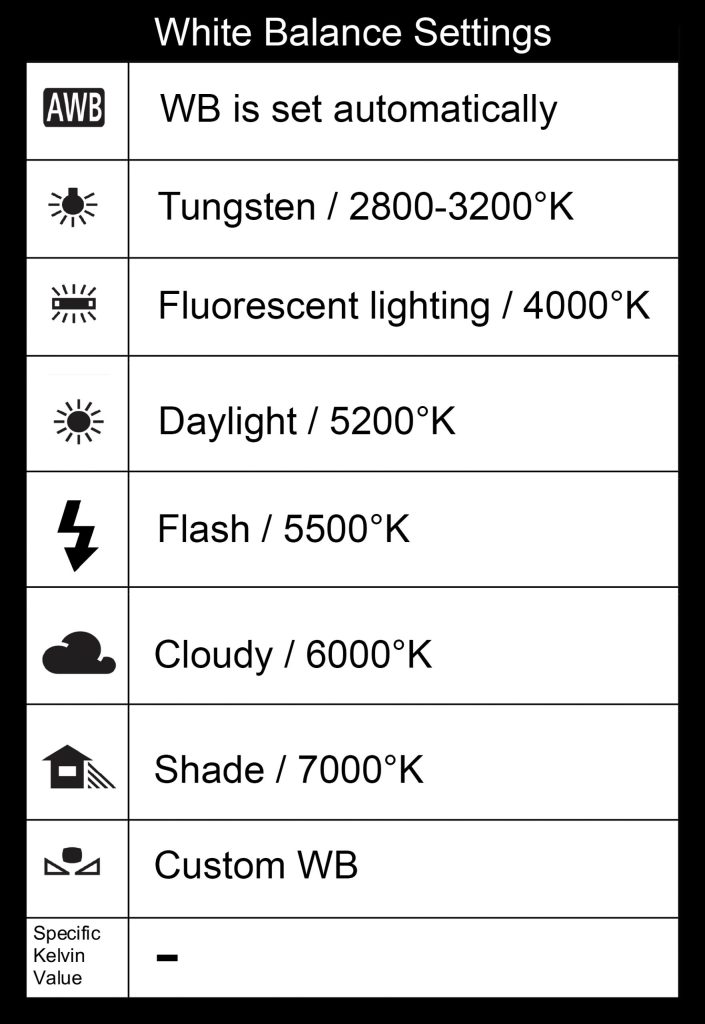
For more precision you can often also specify a particular Kelvin value as your WB setting. This is easier than it sounds, particularly if you are shooting under artificial light. Bulbs, which includes older incandescent bulbs, fluorescent and LEDs, generally have a Kelvin value printed on the box they came in. If you still have this box, or can find out the information online, then you just have to enter that number as your WB Kelvin value. (The table shows the typical Kelvin values of the presets. You can achieve the same effect by entering the relevant Kelvin, rather than using a preset.)
Finally, you could also create a custom WB. The procedure for this varies by manufacturer (and sometime between camera models by the same manufacturer) but the basic principle is simple. Point the camera towards a neutral white or grey surface lit by the same light as your subject. Then, take a reading via the custom WB option, and use the freshly-minted custom WB setting as your WB for that shooting session. (The custom WB setting is only correct for that particularly scene though. If you move to a scene with different lighting, or the lighting changes as you shoot, then you will need to re-do the custom WB.)